The key features of this program are:
- control and configuration via serial IO cable which can be detached when not required
- very low power consumption – must run on batteries and last months
- simple timing functions (eg awake every 20 minutes, take a reading, go back to sleep)
- a PIC 16F627A, 16F628A or equivalent. Other PICs of with similar functionality may work but a re-compile many be required. If ordering PICs make sure you order it in a plastic DIP package.
- a prototyping breadboard
- some way to interface logic voltage level serial IO to a computer (a discussion on this in a moment)
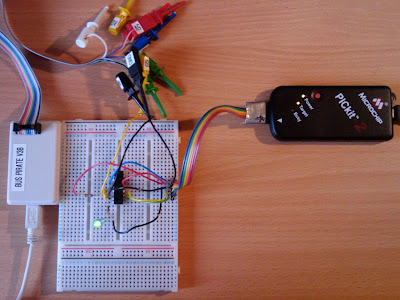
- a PIC programmer (eg PICkit2), ideally configured to program in-circuit
- one LED, a few resistors and some suitable jumper wires for the breadboard
Interfacing a PIC to a PC using Serial IO
Serial IO is a theoretically a very simple way of communicating with a PIC. Most PICs have hardware support for this protocol and until a few years ago most PCs had one or more serial ports (in the form of a 9 pin D connector RS232 port). Unfortunately even though the PC and the PIC speak the same serial IO ‘language’, they do so at incompatible voltage levels, so a direct connection is not possible. There are hacks involving resistors, but it doesn’t always work. The easiest ‘correct’ solution is to use the MAX232 chip which converts logic to RS232 voltage levels.
Leaving aside the voltage level problem, a more serious problem is that RS232 ports are increasingly rare having been replaced by the substantially faster and more flexible USB. Interfacing directly with USB is not trivial without the use of a support chipset such as the FTDI FT232RL.
So there are two approaches to achieve PC connectivity:
- Use USB <--> RS232 adapter (about €25) at the PC end and a MAX232 for voltage conversion at the PIC end
- Bypass the whole RS232 voltage level problem by using a Bus Pirate to act as a bridging device. The Bus Pirate costs about €25 and will avoid the complication of adding a MAX232 to your project.
Configuring a Bus Pirate to act as serial IO bridge
Connect to the Bus Pirate with a terminal emulator (eg minicom on Linux). At the Bus Pirate prompt enter:
m(return) (select mode)
3(return)  (select UART mode)
6(return)  (select baud rate of 19200)
(return) (select 8 bits, no parity - default)
(return) (select 1 stop bit - default)
(return) (select idle 1 - default)
(return) (select open drain, high = high impedance, low = GND)
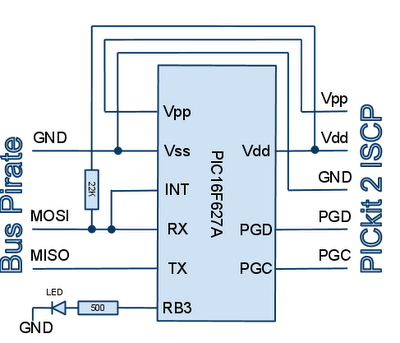
Because we have chosen high to be represented by a high impedance state, a pull up resistor (eg 22K) to Vdd is required (see schematic).
Connect the Bus Pirate ground to Vss/GND, MISO to PIC TX and MOSI to PIC RX. Finally select the bridge mode macro: (1)
Programming the PIC
A socket programmer can be used such as the Velleman K8048. But for development work the constant plugging and unplugging of the chip is a colossal waste of time and will quickly damage the chip’s pins.
Configuring a PICkit 2 as in in-circuit programmer is a far better option. In this configuration the 5 pin ISCP port (Vpp, Vdd, GND, PGD, PGC) is connected to corresponding pins on the PIC. If the Vpp pin is also used in your application (it can double as RA5 or MCLR) a protective diode should be utilized to protect your application circuitry from the ~ 13V programming voltage.
The ISCP port also optionally provides power to the circuit but there are current limits to be aware of: 25mA in the case of a PICkit2. Exceeding that may cause the USB port to switch off (although permanent damage is unlikely). Please refer to chapter 3 of the “PICkit™ 2 Programmer and ICSP™” guide downloadable from http://www.microchip.com for details on the operation of the ICSP port.
Loading the program from Linux
Download the PICkit2 command line Linux utility from http://www.microchip.com/
pk2cmd -PPIC16F627A -FSIODemo.hex -M -T -R
You can power off the PIC at any time with this command:
pk2cmd -PPIC16F627A -W
and power it back up with:
pk2cmd -PPIC16F627A -T -R
Loading the program from Windows
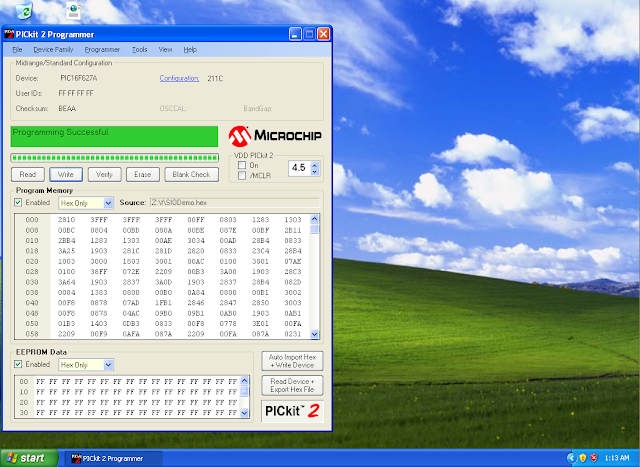
From PICkit 2 Programmer (free download from http://www.microchip.com) choose File -> Import Hex. Then click the “Write” button and if all goes well the status window should turn green with the message “Programming Successful”.
Running the program
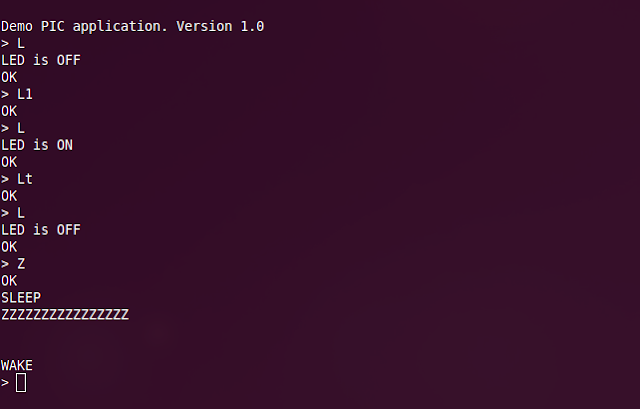
After successful upload of the firmware to the PIC, all going will you should see a welcome message “Demo PIC application. Version 1.0” on the serial port. You can now enter commands at the prompt. These commands are implemented in the execCmd() function. Additional commands can be added as programming space allows. A command comprises a single letter (upper or lower case) followed by optional arguments and terminated by the RETURN
Command summary:
L no params Query LED state. Will return “ON” or “OFF”.
L ‘0’ or ‘1’ Turn LED on or off respectively.
L ‘t’ Toggle LED state
R no params Reset device
T no params Return toc timer
Z no params Put device to sleep. Will confirm with “SLEEP” message. Hit any key to wake device. Will display “WAKE” message on waking.
Command error codes:
On successful command execution an “OK” message will be displayed. If an error is encountered “ERR” followed by an error number will be displayed.
ERR 2 Unrecognized command
ERR 3 Bad command parameters
Compiling the C code
As it stands this application doesn’t do anything very useful. You will need to edit the C to customize for your application.
You will need the MPLAB IDE from Microchip (a free download at http://www.microchip.com). This is a Windows application, but will run under Wine emulation on Linux (just run the installer in Wine).
Download the ZIP archive from http://wombat.ie/software/electronics/PIC/ and unpack it into a directory.
In MPLAB chooise Project -> Open... from the menu and navigate to the directory into which you unpacked the ZIP archive. Choose the SIODemo.mcp project.
Select Configure -> Select Device... and ensure you have the correct target chip selected.
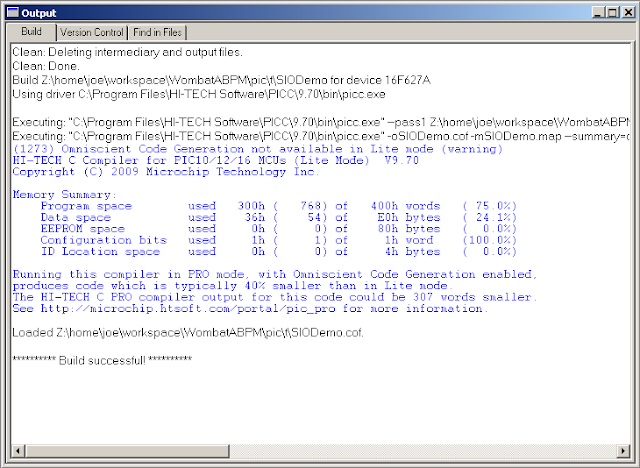
Key CTRL-F10 (or Project -> Project Rebuild from the menu) to rebuild everything.
If all goes well you should have SIODemo.hex in the same directory. Upload the HEX file to the device with the programmer.
The Code
The code and compiled HEX file can be downloaded from http://wombat.ie/software/electronics/PIC/
/**
 * Example of a serial IO shell for a PIC.
 * Rev 27 June 2010.
 * (c) 2010 Joe Desbonnet, jdesbonnet@gmail.com.
 * Distributed under the "Simplified BSD License".
 *
 * This example is intended as a starting point for writing low power PIC apps
 * that need to be controlled over a serial port.
 *
 * This program will listen on the PIC's serial port for commands sent from a
 * human user via a terminal emulator or commands issued from another application.
 * In this example commands are L, L0, L1, Lt (LED status, off, on, toggle
 * respectively, R (reset), T (get sleep clock 'tocs'), Z (go to sleep). See
 * comments at execCmd() function for more details.
 *
 * During sleep mode the device uses very little power (micro watts) and can
 * stay powered on 2 x AAA batteries for months.
 *
 * Tested with 'Lite' version of HiTech C compiler for PIC on target
 * platform PIC16F627A and 16F628A. This code should be read in together with the
 * PIC datasheet which can be downloaded from http://www.microchip.com
 *
 * This program occupies most of the available space of a 16F627A. However the
 * use of stdio functions and liberal use of printf() accounts for a large portion
 * of the space used. For practical apps long string messages are not required and
 * the use of printf() can often be avoided.
 *
 * It is assumed that there is a LED on RB3 (pin 9) which must have a limiting
 * resistor of ~ 500 ohms. The serial port RX and TX and connected to pins
 * 7 and 8 respectively. Also the RX line (pin 7) and INT (pin 6) are tied together
 * to facilitate wake on serial port activity.
 *
 * NB: Do not connect RX and TX directly to RS232 as the voltage levels (typically
 * -15V to -3V for logic 1 and +3V to +15V for logic 0) are not compatible
 * with PIC logic levels 0/ ~5V.
 *
 * Simplified schematic:
 *
 *          +-----------+
 *          |   PIC     |
 *          |16F627/8(A)|
 *          |           |
 * GND------|Vss     Vdd|------ 2 - 5V
 *          |           |
 *      +---|INT        |
 *      |   |           |
 *  ----+---|RX         |
 *          |           |
 *  --------|TX         |
 *          |           |
 *    +-----|RB3        |
 *    |     +-----------+
 *  500ohm
 *    |
 *   LED
 *    |
 *   GND
 *
 * Not shown: logic <--> RS232 conversion, optional crystal resonator.
 *
 * It is generally recommended that unused input pins are tied either high
 * or low through a ~ 10K resistor. However I have found that if setup correctly
 * (specifically MCLR and LVP are disabled) unused pins can be left floating.
 *
 */

#include <htc.h>
#include "stdio.h"

// Bit manipulation macros
#define BIT(x)   (1 << (x))
#define SETBIT(p,b) (p) |= BIT(b)
#define CLRBIT(p,b) (p) &= ~BIT(b)
#define TOGBIT(p,b) (p) ^= BIT(b)
#define TSTBIT(p,b) (p) & BIT(b)

/*
Configuration Word:

Oscillator
--------------
HS:    High speed external oscillator
INTIO: Internal oscillator (4MHz)

Remember to set FOSC accordingly.


Watch Dog Timer (WDT)
--------------
WDTEN: Watch dog timer enable
WDDIS: Disable watch dog timer

When enabled a SLEEP operation will resume at the next instruction when the timer
rolls over.  Otherwise SLEEP can only be interrupted by an external event. It takes
about 2 seconds for the timer to roll over. A simple low-accuracy sleep clock can
be made by counting the SLEEP/wake cycles. The device can be awoken after a set
period of time this way (not implemented in this version). When the WDT is enabled
a WDT roll over while awake will cause a device reset which we don't want in the
application. So it's important that the WDT is cleared periodically by calling
CLRWDT().

Other features
--------------

Unused features are disabled.

PWRTDIS:   Power up timer disable
BODIS:     Brownout reset disable
UNPROTECT: Code protection disable
MCLRDIS:   Master Clear disable. Prevents spontaneous resets if MCLR left floating.
LVPDIS:    Low Voltage Programming disable. Prevents problems if RB4/PGM pin left floating.

A note about MCLR and LVP features: if you do enable those features, it is vital
that you *don't* allow MCRL and PGM pins to float. Tie them high or  low via a
~ 10K resistor. If you don't you will probably experience spontaneous  resets
and intermittent failures.

*/

__CONFIG(INTIO & WDTEN & PWRTDIS & BORDIS  & UNPROTECT & MCLRDIS & LVPDIS);

// Oscillator frequency. Set to 4000000UL if using internal oscillator. Else
// set to the external crystal frequency.
//#define FOSC 10000000UL
#define FOSC 4200000UL

// Desired serial port baud rate. In theory any value is possible, but the
// traditional values are 300, 1200, 2400, 4800, 9600, 19200, 38400, 112500
// [Note about max speed, 19200 max with internal 4MHz osc?]
#define BAUD 19200

#define BUF_LEN 8  // Define the length of the command buffer
#define LED_PIN RB3  // Define LED pin.
#define LED_TRIS TRISB3 // Define LED tri-state bit (for configuration to output)


// Function prototypes
unsigned char execCmd();
void prompt();
void crlf();

// Flags shared with ISR. For convenience using an entire 8 bit value to represent
// a single flag. A value 1 being set, 0 being clear. This is wasteful and you may
// want to use individual bits of a one general flags variable if space becomes tight.
volatile unsigned char sleepMode; // set to 1 if currently SLEEPing as much as possible
volatile unsigned char wakeFlag; // set to 1 by ISR to signal to main loop to wake up
volatile unsigned char cmdFlag;  // set to 1 by ISR to signal to main loop that ENTER was received

volatile unsigned char bufp;  // indicates the position of the next free char in the buffer
char buf[BUF_LEN];     // command buffer

unsigned int toc = 0;    // initialize our simple clock to 0

/**
 * Initialize hardware
 */
void init(void) {

 //
 // Configure serial port
 //

 // Serial Port Baud Rate Generator. Ref sect 12.1
 // "USART Baud Rate Generator (BRG)", page 75 of datasheet.
 SPBRG = (int)( FOSC / (16UL * BAUD) - 1 );

 // Receive Status register
 // 1--- ----  SPEN (Serial Port Enable)
 // ---1 ----  CREN (Continuous Receive Enable)
 RCSTA = 0x90;

 // Transmit Status register
 // --1- ----  TXEN (Transmit Enable)
 // ---- -1--  BRGH (High baurd rate select)
 TXSTA = 0x24;


 //
 // Configure interrupts
 //

 GIE  = 1;      // Enable all unmasked interrupts
 PEIE = 1;      // Enable all unmasked peripheral interrupts
 INTE = 1;      // Enable external interrupt on RB0 (also tied to RX for wake-on-RX)
 RCIE = 1;      // Enable RX interrupt (only works while awake)


 //
 // Configure LED pin as output
 //

 LED_PIN = 0;     // Set to off on latch
 LED_TRIS = 0;     // Set pin as output

}


void main(void){
 unsigned char status;

 init();       // Initialize hardware

 // Display welcome message. NB: use of printf draws in 100s of bytes of library
 // code. Use only if you have to. I recommend not using stdio.h functions and
 // using the using putch() function defined here to output short messages.
 crlf();
 printf ("Demo PIC application. Version 1.0");
 crlf();
 prompt();

 // Main loop
 while (1) {

  // Display wake message if we are awakened from SLEEP
  if ( wakeFlag ) {
   sleepMode = 0;
   wakeFlag = 0;  // reset wakeup flag

   // Display wake message and prompt
   crlf();
   crlf();
   printf ("WAKE");
   crlf();
   prompt();
  }

  // If command entered (chars + ENTER key on serial port) execute command
  if ( cmdFlag ) {

   crlf();

   // Less than 2 chars (including CR) in command buffer is empty commmand.
   if (bufp >= 2) {

    // Execute the command
    status = execCmd();

    // Display OK  message if successful, error message otherwise.
    if ( status == 0 ) {
     printf ("OK");
    } else {
     printf ("ERR %d", status); // NB: %d pulls in *lots* of lib code
    }
    crlf();

    // If sleepMode set it must mean that we have just been issued
    // a sleep command (as we have to be awake to receive a command).
    // Display a SLEEP message to indicated to the user that the device
    // is now asleep.
    if (sleepMode) {
     printf ("SLEEP");
     crlf();
    }

   }

   // Reset command buffer
   bufp = 0;
   cmdFlag = 0;

   // Display prompt for next command if in wake mode
   if ( ! sleepMode) {
    prompt();
   }

  }

  if (sleepMode) {

   putch ('Z');

   // Can (optionally) disable INT interrupt while awake.
   // If INT is left running the ISR will be called for every
   // incoming bit transition in the RX line. While this should
   // not cause a problem, it is causing unnecessary CPU activity
   // which generally should be avoided.
   INTE=1;   // Enable INT to facilitate wake on RX
   SLEEP();  // Sleep until INT or Watch Dog Timer expires
   INTE=0;   // INT not needed while awake.

   toc++;   // Update our simple clock

  } else {
   CLRWDT();  // If awake, clear watch dog timer as often as possible
  }

 }

}

/**
 * This function parses the command buffer (buf) after the user hits the
 * RETURN key and executes whatever command that may have been entered.
 * Commands are letters (upper or lower) followed by optional arguments.
 *
 * L <RETURN> - Display LED status
 * L0 <RETURN> - LED on
 * L1 <RETURN> - LED off
 * Lt <RETURN> - LED toggle
 * R <RETURN> - Reset device
 * T <RETURN> - Display sleep clock
 * Z <RETURN> - Put device to sleep. Any key will re-awaken.
 *
 * @return status code.
 *  0: success
 *  2: unrecognized command
 *  3: bad parameter
 */
unsigned char execCmd() {

 // Get command letter (assume first char is letter) and convert to
 // uppercase using bit manipulation (set bit 5 low)
 char c = buf[0];

 CLRBIT (c,5);  // Convert to uppercase by clearing bit 5 to 0.


 switch (c) {

  // LED command.
  case 'L':
   if (bufp == 2) {
    printf ("LED is ");
    if (LED_PIN) {
     printf ("ON");
    } else {
     printf ("OFF");
    }
    crlf();
    return 0;
   }
   c = buf[1];
   if (c == '0') {
    LED_PIN = 0;  // LED off
    return 0;   // Return OK
   }
   if (c == '1') {
    LED_PIN = 1;  // LED on
    return 0;   // Return OK
   }
   if (c == 't') {
    LED_PIN = ! LED_PIN;// LED toggle
    return 0;
   }
   return 3;    // Return bad parameter error
   // break not required

  // Reset command
  case 'R':
   printf ("RESET");  // Indicate to user that device is about to be reset
   crlf();
   asm ("goto 0");   // Jump to addr 0 achieves a reset
   // break not required

  // Sleep timer query
  case 'T':
   printf ("%d",toc);  // WDT takes about 2s to roll over. x2 to get seconds
   crlf();
   return 0;
   // break not required

  case 'Z':
   sleepMode = 1;   // Enable sleep mode. Next iter of main loop will put dev to sleep
   break;

  // Unrecognized command
  default:
   return 2;
 }

 // Return success code
 return 0;
}


/**
 * Interrupt Service Handler (ISR)
 *
 * Any enabled interrupt will cause the CPU to jump to this routine. The C compiler
 * takes care of saving context at the start and restoring it when finished. The
 * code in the ISR needs to check interrupt status flags to see which interrupt(s)
 * caused the ISR to be invoked. The ISR should be kept as short as possible. In
 * general if work needs to be performed as a result of an interrupt *don't* do it
 * in the ISR. Instead set a flag and have the main loop poll the flag and have it
 * do the work.
 *
 * Variables modified by ISR:
 *   wakeFlag
 *   bufp
 *
 * Note variables that are modified here
 * must be declared 'volatile'. This is because an optimising C compiler will
 * make incorrect optimisations based on the false assumption that the
 * value cannot spontaneously change. See this article for a discussion:
 * http://www.embedded.com/story/OEG20010615S0107
 */
interrupt isr () {

 unsigned char c;

 // Check if INT interrupt was triggered
 if ( INTF ) {
  if (sleepMode) {
   wakeFlag=1;   // Tell main loop we are awake now
  }
  INTF = 0;    // Clear interrupt flag (else isr will be called again on exit)
 }

 // May have more than one char in the buffer - so need to loop until buffer empty. Else we can have lag (?)
 while (RCIF) {

  c = RCREG;    // Read from USART and add to command buffer

  // ESC (ASCII code 27) key causes immediate reset at all times.
  if (c == 27) {
   asm("GOTO 0");  // Jumping to address 0 is how device reset is achieved
  }

  TXREG = c;    // Echo back char if possible

  buf[bufp++] = c;  // Add char to buffer

  // If ENTER or buffer full signal to main loop that we have command
  if (c == '\r' || bufp == BUF_LEN -1) {
   buf[bufp]=0;  // Zero terminate for safety (TODO: this added lots of bytes to code -- can we optimize?)
   cmdFlag = 1;  // tell main loop we have a command entered
   break;    // Exit loop: any further chars in buffer can be ignored
  }

 }

}

/**
 * Send a character to serial port. If buffer is full then wait until space
 * is available. Will wait indefinitely.
 */
void putch(unsigned char c) {
 while ( ! TXIF ) ;   // Loop until TX register available
 TXREG = c;     // Write character to TX register
}


/**
 * Write CR LF (new line) sequence to serial port.
 */
void crlf () {
 putch ('\r');
 putch ('\n');
}
/**
 * Write command prompt to serial port.
 */
void prompt () {
 putch ('>');
 putch (' ');
}
