Tuesday, November 30, 2010

Hot water tank experiment

I've been wondering why my hot water takes an unusually long time to heat up in recently. When I first moved in almost 8 years ago it seemed that it took only about 20 minutes to get piping hot water. Nowadays it takes 40 minutes or more ... and even then it's not that hot.

I was curious about the temperature profiles of my hot water tank as it was being heated by my natural gas powered water heater ("boiler" or "furnace"). As is normal in Ireland, household hot water is provided from hot water storage tank which is heated via heat exchanger by the central heating system.

The following is the temperature at the heat exchanger inlet and outlet of the hot water tank. Temperature was measured with DS18B20 temperature sensors which were taped to the pipe near the tank.

A few things struck me as being interesting about this graph. First there is a brief but noticeable dip in inlet temperature when the system is first switched on. This is clearly the cold water ahead of the pump/heater entering the heat exchanger. There is a quick rise in temperature with the outlet temperature following the input minus a temperature drop (due to heat transferred to the water in the tank) and a time lag (due to the transit time of water in the heat exchanger). However the most striking feature is the temperature cycling.

It seems that my heater cannot transfer heat to the tank fast enough. The water in the heat exchanger circuit reaches the heater's target water flow temperature (user settable from 30°C-85°C) and the flame cuts off. The pump continues to pump until the temperature drops below some threshold and the cycle repeats. The duty cycle is about 50 seconds flame on, and 180 seconds flame off.

There is another interesting effect during the cooling phase: a brief increase in temperature for about 30 seconds before dropping again. I believe this artifact is because the heater flame is on for less time that it takes for the water to circulate around the system. So there is a hot spot which makes a second round through the system.

I re-ran the experiment with a higher heater temperature:

It looked identical (excepted at elevated temperatures). But only when I looked at the numbers more closely while writing this post did I realize that the period between cycles had increased from about 230 seconds to 330 seconds. So perhaps if I set the heater at the max temperature I could increase the period to a sufficiently long time to heat the water in the tank in just one cycle.

The following graph is from a third run. This time the heater was set at the max temperature (supposedly 85°C) and I set the tank thermostat at 40°C.

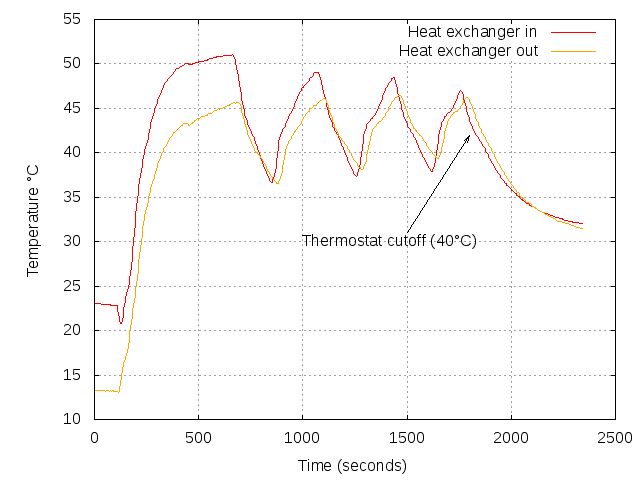
Unfortunately there was still cycling, 4 in total, but the cycle period was considerable longer than any than the previous runs. More importantly the duty cycle was much better: 500 seconds of flame on, 100 seconds flame off for the first cycle; 220s on/100s off for second, 180s on / 100s off for third, and 140s on for the last cycle. The tank thermostat cut off the heater at about 1800 seconds (30 minutes) into the experiment.

Conclusion:

For fast hot water, running the heater as hot as possible works best (at least for me). At some point the heater temperature must have been turned low which explains why in recent years it seems to be taking ages for the water to heat. However all this probably makes no difference to the energy efficiency of the system.

Tuesday, November 2, 2010

Hotpoint Aquarius FDW60 dishwasher drain pump repair

A few years ago our 2004 Hotpoint dishwasher (Aquarius FDW60) started failing in mid cycle with a flashing "Eco" and "Fast" LED. The underlying cause was that the grey water drain pump wasn't pumping. There was precious little information about reparing the device on the internet. Faced with a repair bill of at least €140 we were close dumping and replacing it. I figured there was nothing to lose by investigating the problem myself and after a little puzzling over the layout of the various inards of the device I eventually located the drain pump, disconnect it, manually rotated the impeller a few times with a srewdriver, reconnected it... and sure enough everything was back to normal.


Two years later after flawless operation, the problem has returned. This time I thought I'd document the repair procedure in case it's of use to anyone else.

First a caveat: don't try this unless you are comfortable with DIY repair and have at least a basic understanding of electrical safety. The instructions here worked for me, but may not be the "correct" way of doing things. If you do decide to proceed YOU DO SO AT YOUR OWN RISK. Also, if there is any warrantee remaining on the appliance it may be voided by your attempt to repair. Feel free to add feedback below if you have any interesting information to add.

The tools you need for this are:

  • Phillips head screwdriver (number 2), but you might get away with a flat head
  • Torch (optional)
  • Bucket (optional)
  • Rag (optional)
  • Brush and/or vacuum cleaner (optional)
  • FDW60 manual (optional)

Empty any water remaining in the dishwasher. Remove the filters and drawers (the top drawer requires that you to remove a plastic stopper at the end of the drawer rail). Use a rag to mop up any remaining water in the drain well. Switch of the unit and remove power at the wall socket or fuse.

Before disconnecting the cold water in ensure that the water supply to the appliance is OFF. This is usually accomplished by means of a valve leaver near where the hose connects to the water supply. Leaver perpendicular to the pipe usually means OFF. Have a bucket and rag ready to catch any residual water in the hose.


Same applies to the grey water outlet hose. This water may have a foul oder -- so be prepared.


Ensure that the power cord and the two water hoses are free to move as you gently pull the appliance out.


Place some newspaper on the ground and have some rags on the ready. Stuff a rag in the drain well to absorb residual water. Gently lay the appliance on its side. Be prepared from some water to seap out. The bottom of the appliance is now exposed. Use a brush or vacuum cleaner to clean the bottom.


Double check that you have electrically disconnected the appliance (don't just rely on the appliance on/off button!). Best to physically disconnect the power cord from the wall socket. If you can't do this then trip the fuse associated with the appliance. Verify there is no power by switching the device on and ensure the power neon does not light.

The bottom panel can be removed by unscrewing 6 (Phillips Head Size 2, I think) screws marked by red arrows in photo. You may need to temporarly remove the front legs to access two of the front screws(just twist the leg until it comes out).


Most of the essential dishwasher components are now accessible. The drain pump can be removed by unscrewing one screw (see photo) and twisting the pump assembly.


The impeller should now be visible inside the pump chamber. Use a pen or screw driver to rotate the impeller a few revolutions. There will be some resistance due to the pump motor – that is normal.


Ensure that there are no foreign objects stuck in the chamber (use a torch to illuminate the chamber while rotating the impeller). In my case I found a pumpkin seed!


Reattach the pump assembly (be careful to ensure the o-ring seal is still there).

Replace the bottom panel. Bring the unit upright. Reconnect power and water hoses. Run a "Prewash" cycle to test.

That should be it!

Boot note: On my first attempt at reattaching the pump assembly I failed to engage all three posts of the bayonet twist lock mechanism (the one at the back which isn't easy seen had not engaged). This resulted in water leaking during my test which caused the float switch activate. This manifests itself as as flashing "Eco" LED and the drain pump runs continuously. Once the pump was attached properly everything ran smoothly.

Update (24 Jan 2011): I've added additional information about the this dishwasher's controller board in this blog post.

Update (7 Mar 2011): A Hotpoint technician told me that this can often be solved without removing/opening the unit by using something like a wire coat hanger to unstick the drain pump impeller. I've never tried this, so I can't comment on its effectiveness and it probably won't help if there is a foreign object lodged in there.

Update (25 May 2011): Impeller got stuck again today. This time I tried the coat hanger trick that was suggested to me by the Hotpoint technician. It worked! I had to do it twice... first time the pump started working, but it sounded rough and then jammed again. The second time it again sounded rough for a few seconds but recovered and seems to be fully back to normal now. There was probably a foreign object in the pump chamber that got expelled eventually. You need a wire coat hanger and make a right angle bend like this:


The horizontal part (running parallel to my measuring tape) goes into the drain hole. See photo of the underside of the dishwasher above to get an idea of what's going on. About 10cm - 11cm is what you need to reach the impeller. Then just wiggle it... all it takes is just the slightest movement of the impeller to unstick it. Of course if you have a large foreign object stuck in there this probably won't help – you'll need to disassemble the pump as described in the main part of this post.